VSCode调试PostgreSQL源码

总结

本文讲述了如何在Ubuntu20.04上使用对PostgreSQL进行调试

1. 环境

Win10 VMware Workstation,Ubuntu版本:20.04

2. PostgreSQL部分准备

2.0 创建一个名为postgres的新用户,以下所有默认在postgres用户下操作

2.1 使用git clone安装最新稳定版本的PostgreSQL

1
2
3
4
git clone https://github.com/postgres/postgres.git  // 如果git速度慢可以去gitee搜索postgres使用gitee仓库进行clone
cd postgres
// 新建Branch,在此Branch上进行更改操作
git checkout -b FEATTURE-NAME

2.2 安装PostgreSQL需要的各种依赖包以防运行时报错

1
sudo apt-get install build-essential libreadline-dev zlib1g-dev flex bison libxml2-dev libxslt-dev libssl-dev libxml2-utils xsltproc

2.3 输入以下命令对PostgreSQL进行配置

1
./configure –enable-debug –with-systemd // 允许调试,开启postgresql的service服务

2.4 将”src/Makefile.global”中代码优化选项移除

1
2
3
4
5
6
// 移除前
CFLAGS = -Wall (…) -fexcess-precision=standard -g -O2
CXXFLAGS = -Wall (…) -g -O2
// 移除后
CFLAGS = -Wall (…) -fexcess-precision=standard -g
CXXFLAGS = -Wall (…) -g

2.5 执行make和install

1
2
make
sudo make install

2.6 (可选)为PostgreSQL设置共享库的搜索路径

1
sudo /sbin/ldconfig /usr/local/pgsql/lib

2.7 添加PostgreSQL的bin目录到PATH路径,在~/.bach_profile或者/etc/profile或者zsh相关文件下添加如下一行

1
PATH="/usr/local/pgsql/bin:$PATH"

重启Terminal后打印PATH可以看到路径被添加

2.8 创建data目录用于数据库文件的存放

1
mkdir <datadir> // 目录的存放位置随意,最好在自己的用户目录下

2.9 对data目录进行初始化

1
initdb -D <datadir>

2.10 创建”/etc/systemd/system/postgresql-14.service”文件,内容如下

1
2
3
4
5
6
7
8
9
10
11
12
13
14
15
[Unit]
Description=PostgreSQL14 database server
Documentation=man:postgres(1)

[Service]
Type=notify
User=<username>
ExecStart=/usr/local/pgsql/bin/postgres -D <datadir>
ExecReload=/bin/kill -HUP $MAINPID
KillMode=mixed
KillSignal=SIGINT
TimeoutSec=0

[Install]
WantedBy=multi-user.target

其中是你当前的用户名,这里是postgres

2.11 (可选)配置系统自动启动postgresql-14服务

1
sudo systemctl enable postgresql-14

2.12 启动服务

1
sudo systemctl start postgresql-14

2.13 连接到PostgreSQL

1
psql -U postgres

如果当前用户不是postgres,那么请先自己使用

1
createdb <dbname>

创建一个数据库后使用以下命令登录

1
psql -U <username> <dbname>

2.14 创建表以及插入数据

1
2
3
create table t1(id integer, name text);
insert into t1 values(1, 'pgsql1');
insert into t1 values(2, 'pgsql2');

2.15 在psql终端输入语句得到backend的pid

1
select pg_backend_pid();

3. VSCode部分准备

3.1 选择[Run]->[Add Configuration],在launch.json中添加新的配置,launch.json各参数具体含义见 VSCode Debugging

1
2
3
4
5
6
7
8
9
10
11
12
13
14
15
16
17
18
19
20
21
22
23
24
25
26
27
28
29
30
31
32
33
34
35
36
37
38
39
40
41
42
43
44
45
46
47
48
49
50
51
52
53
54
55
56
57
58
59
60
61
62
63
{
"version": "0.2.0",
"configurations": [
{
"name": "postgres --help",
"type": "cppdbg",
"request": "launch",
"program": "/usr/local/pgsql/bin/postgres",
"args": [
"--help"
],
"stopAtEntry": false,
"cwd": "${fileDirname}",
"environment": [],
"externalConsole": false,
"MIMode": "gdb",
"setupCommands": [
{
"description": "Enable pretty-printing for gdb",
"text": "-enable-pretty-printing",
"ignoreFailures": true
}
]
},
{
"name": "initdb",
"type": "cppdbg",
"request": "launch",
"program": "/usr/local/pgsql/bin/initdb",
"args": [
"-D",
"<datadir>"
],
"stopAtEntry": false,
"cwd": "${fileDirname}",
"environment": [],
"externalConsole": false,
"MIMode": "gdb",
"setupCommands": [
{
"description": "Enable pretty-printing for gdb",
"text": "-enable-pretty-printing",
"ignoreFailures": true
}
]
},
{
"name": "postgres backend",
"type": "cppdbg",
"request": "attach",
"program": "/usr/local/pgsql/bin/postgres",
"processId": "${command:pickProcess}",
"MIMode": "gdb",
"setupCommands": [
{
"description": "Enable pretty-printing for gdb",
"text": "-enable-pretty-printing",
"ignoreFailures": true
}
]
}
]
}

一共有三个例子,一个postgres –help,一个initdb,一个postgres后端调试。在src/main/main.c中的main函数打上断点可以调试postgres –help

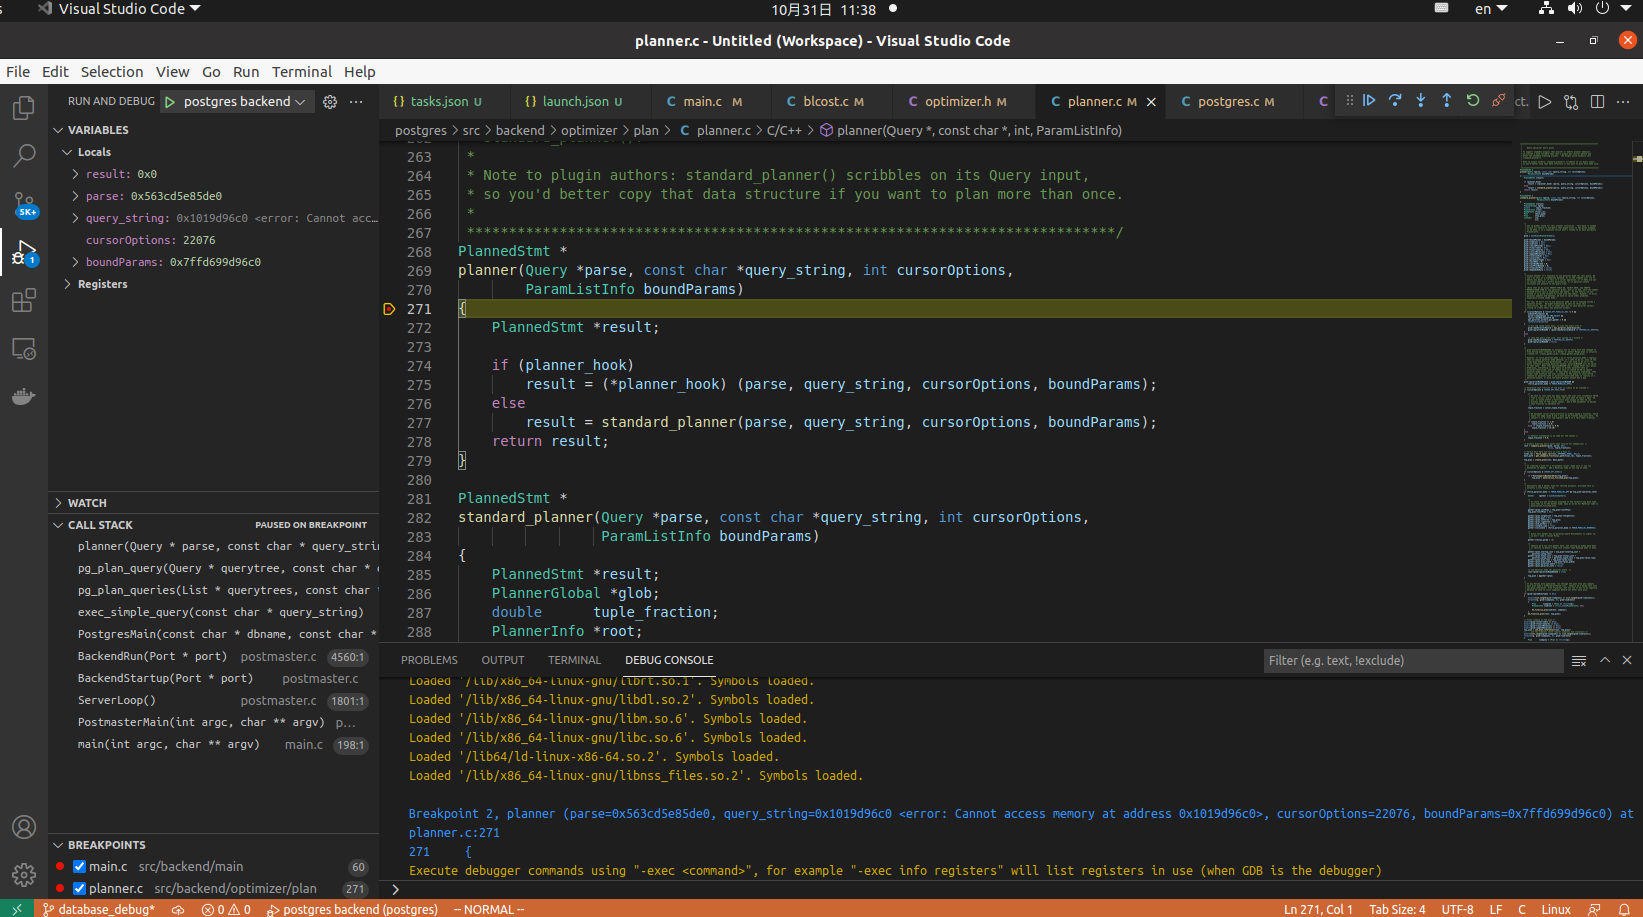
3.2 首先在src/backend/optimizer/plan/plan.c的planner中打上断点,在侧边栏Run and Debug中选择postgres backend,点击调试按钮或者按F5后,输入2.15得到的pid进行调试,可能需要使用superuser权限进行连接,选择y就好

3.3 在psql终端中输入”select * from t1 where id = 1;”,如果看到在VSCode中代码在planner.c处停止,说明成功了
4. 参考链接

How to do linux debugging PostgreSQL remotely using Visual Studio Code

如何使用VSCode进行PostgreSQL开发及调试

Compile and Install from source code

lishizhen/postgresql84_debug